Check out The First Ascent's new website!
http://www.freewebs.com/thefirstascent/index.htm
Monday, October 13, 2008
Friday, September 12, 2008
Yosemite Decimal System
Yosemite Decimal System is a used in the United States and Canada to rate difficulty of hiking and climbing. It is broken down into these 5 classes:
Class 1:
• Hiking
• Bike path
• Walking uphill
Class 2:
• Hiking
• Possibility of using your hands for balance
• Non-existent trail
Class 3:
• Using both hands and feet
• Rope may be used here, but is not required
Class 4:
• Climbing on steep terrain requiring rope
• Natural protection easily found and used
• Falls could be fatal
Class 5:
• Technical free climbing
• Required rope, belay, and placing protection
Class 6
• Aid climbing only (Rope ladders, etc)
Because we are focusing on the sport of rock climbing, let’s take a better look at Class 5. Now that we determine that we are climbing a class 5 level route, we need more information to decide on how difficult it is. The way YDS (Yosemite Decimal System) grades routes after placing them into a class is by simply adding a decimal and a new number. So, because we are looking at class 5, the difficulty grades will look like this: 5.1, 5.2, 5.3, ….5.13 and so forth. The 5.1 will be the easiest route while getting harder the higher the second number becomes. Routes 5.0-5.6 are very easy. There are more than enough foot and hand holds to grab. The holds themselves are large and can be easily held on to. Routes graded 5.7-5.9 are more intermediate. The holds are still fairly large, but they are spread out a bit more. The climber has to think more about what moves they will use and chose the best holds accordingly. Routes graded 5.10-5.11 are difficult. Here the holds become smaller and you start to run into what are called “crimps.” A crimp is a small handhold that a climber uses by holding on with their fingertips on the narrow edge of the hold. Climbers also refer to these are crimpers. These holds in particular are very strenuous and take a great deal of energy. Along with the number that shows the difficulty of the route, the YDS also offers a little more detail. If the route is a 5.10 but is fairly easy for having such a rating, the route would be considered a 5.10-. The negative sign tells the climber that it may be a 5.10 but it’s on the low side of the difficulty scale. Similar is done for routes on the higher end of this scale, so instead of a 5.10- , you also can see a 5.10+. This way of grading routes offers the climbing some knowledge of what to expect, however it still leaves the climber to question how strenuous the climb is and the difficulty of the hardest move. But once you start working a route, you can discover these things for yourself.
Wednesday, September 10, 2008
Grading a Route
When climbing, you will notice that each route is given a grade. This is critical knowledge for a climber. The grading of a route tells the climber exactly what to expect from difficulty, to safety, to the hardest moves, and even the type of rock being climbed. Here in the United States, we use the Yosemite decimal system so grade routes. However, other parts of the world use their own way of grading routes. Some grading criteria is very specific and informs the climber of almost everything there is to be considered. On the other hand, some grading scales offer only minimum information. When you think to yourself about that, would you want to climb a route where there will be no surprises and it is not as much of an adrenaline rush or a route where everything is a discovery and you feel very unsafe. You'd be surprised by who would not actually mind the second one. For the most part, different countries offer their own version of grading scales. Many serious climbers do not stay in the States alone to climb. It is valuable knowledge to know the different grading systems when traveling to climb so that you do not find yourself halfway up a route that is above your difficulty level.
Here are a couple of the more widely used grading systems.
This is a chart that shows each grading system and compares each systems ratings with others.

Here are a couple of the more widely used grading systems.
This is a chart that shows each grading system and compares each systems ratings with others.

British Climbing Grades
The British way of grading routes is something one will not run into often while climbing in the States but it is good to have a decent understanding of it if you ever plan to climb elsewhere in the world. The British are different in the sense that they grade the route in two parts. The two parts are Adjectival grade and Technical grade.
First, the adjectival grade; It sounds a little silly but this grading is very straight forward. They define a route as the following:
• Easy (rarely used)
• Moderate (M, or "Mod")
• Difficult (D, or "Diff")
• Hard Difficult (HD - sometimes omitted)
• Very Difficult (VD, or "V Diff")
• Hard Very Difficult (HVD – sometimes omitted)
• Severe (S)
• Hard Severe (HS)
• Very Severe (VS)
• Hard Very Severe (HVS)
• Extremely Severe (E1, E2, E3, ...) *The E1 stands for easiest, E2is harder and so on. *
The terminology may seem a little vague, and it is. To accommodate, the British also include details about a route. Terms such as strenuous, sustained, and bold are used to help depict the route. The adjectival grade also describes the type of rock you will be climbing like if you are climbing a crack.
The other part of the grading is the Technical grade. The technical grade is used to inform the climber of how hard the hardest move on the route is called. This scale looks like this:
• 1a -1b-1c
• 2a-2b-2c
• 3a-3b-3c
• 4a-4b-4c
• 5a-5b-5c
• 6a-6b-6c
• 7a-7b-7c
Typically this rank will increase with the adjectival grade. So when you put it together, you could climb a moderate route (M) with a move on the route that ranks at a 2a. With knowing a little bit more about how the rest of the world ranks its routes, you won’t make the mistake of attempting to ascend a VS 7a without preparing appropriately.
Tuesday, September 9, 2008
Top Rope Climbing
Top rope climbing is the most basic style of climbing. Many have probably seen this style of climbing at the state fair or a sporting store where there is a rock wall. This style is all about enjoying the moment, working your muscles, having fun, and not worrying about dire consequences. Top roping is great for everyone. Beginners are able to get satisfaction from climbing a route while practicing simple techniques and advance climbers can scale routes, working on endurance and building strength.
Top rope climbing put simply, is the rope being attached to the climber, up through an anchor at the top of the route, and then back down to where the person belaying. Where every the climber is on the route, the rope is above them. Here is a picture to illustrate:

The benefits of climbing this way are great. If the climber was to take a fall, it would be only a foot or so fall. Also, the climber has less to worry about and can focus on other things while climbing. Although top rope climbing is the easiest and most fun going, there are skills to be considered. A climber needs to know how to set anchors (if they are not previously set), how to belay and lower a climber, how to tie a figure 8 follow through knot, and follow the figure eight with a safety knot.
Anchors are at the top of a route where the rope is strung through. These are placed securely by using permanent fixed bolts or pitons, or a natural object such as a tree or boulder. Belaying is an important part of climbing, regardless of why style you chose. For top roping, a belayer is responsible for having the rope properly placed through the belay device and needs to focus on removing slack in the rope while the climber ascends the route. The belayer needs to keep their attention on the climber so if he or she falls, the belayer can quickly hold to keep the climber from falling to far. The figure-8-follow-through knot may be the most complicated part of climbing. First, the climber ties a figure 8 knot, which you can see how to do in the following photo.
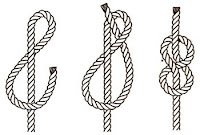
After tying this knot, you pull the rope through 2 points on contact in your harness (your waist loop and the harness loop between your legs.) Then you retrace the figure-8 with the loose end of the rope. Be sure to make sure you are going over and under in the appropriate places. After this, you should have the loose end of the knot sticking out in the same direction the rope on the route is facing. Here, you will tie a safety knot, which is much like a fisherman’s knot. Once you are finished, it should look like this.

Monday, September 8, 2008
Harness
Because a harness plays such an important part in a climbers safety, there are many things to look at while buying one.

First off, the belay loop is an option you can get on a harness. It is a loop extending from the waist to the leg straps. This makes hooking up for belaying easier, especially if you are outside in the cold, trying to strap in with mittens.
Gear loops go along the outside of the harness. These are designed to hold items such as belay devices, quick draws, or even shoes why you are not wearing them. Harnesses come with different number and sizes of these loops. When purchasing a harness, consider what kind of gear you will be planning on holding on the loops.
Leg loops are the straps that go around the climbers legs. If you plan on climbing in the same conditions every time then it'd be ideal to purchase a harness that does not adjust. However, if you plan on wearing layers or climbing outdoors, then an adjustable leg loop would be preferred. Leg loops are also offered with padding. It's recommended you do this for all climbing (except mountaineering.)
Taper is another thing to consider with the leg loops. While looking for a harness be sure that the leg loops do not hinder your mobility and taper enough to make sure of this.
Here is an Matrix from www.abc-of-rockclimbing.com that will help show what kind of harnesses to look for, for each type of climbing:

Climbing Shoes
Just like there are different pairs of shoes you wear from day to day, there are different types of climbing shoes worn depending on what type of climbing is to be done. Even the size of shoe you buy changes when it comes to climbing shoes. Typically, you will be wearing a size smaller than what you bought your tennis shoes in. A climbing shoe will be tight enough that your foot has no room to move around. More extreme climbers say your shoe should fit uncomfortably tight. So tight, that walking around in them is not suggested. The reason they claim this, is so that you can actually feel the hold on your foot and when you do strategic moves such as heel hooking, your shoe does not slip.
A tip when you go to purchase your first pair of shoes; try on everything. It is hard to tell what kind of shoe will work best for you at your skill level. It's best just to try on everything and see what feels the best and what shoe you can grow in experience in.
There are 4 types of climbing shoes that are the most popular: All-Around, Bouldering, Gym, and Trad shoes.
All-Around climbing shoes are examples of a classic climbing shoe. These type of shoes would be best for a new climber. Not only are they less aggressive and will not hurt the foot, but it also offers a stiffer sole. By having a stiffer sole the shoe will help the climber when it comes to holding on to small holds while the climber's muscles develop. The sole also prevents the foot from being pinched in cracks or awkward holds. Again, this is a good place to start for a beginning climber.

Bouldering climbing shoes are the high end climbing shoes. These are the ones you see in climbing magazines. The design is fairly simple. The toe is asymmetrical or down-turned which lets the big toe have more power. The sole of the shoe is also thinner. Extreme climbers prefer to be able to feel the holds beneath their feet and the thinner sole allows this. It takes a lot of practice and hard work to get to the level where a shoe like this is necessary.

Gym climbing shoes are fairly to the point. Most of the all-around shoes would work. However, when climbing indoors it is important to remember to take off the shoes after climbing. By doing this, you prolong the life of the shoe by preventing unneeded wear on it.

Trad climbing shoes are the most stiff shoes of the bunch but are intended to be worn all day. These shoes are built for mutli-pitch climbing so they are assumed they will be put through a lot of wear. Some even offer a padded heel in case hiking will be done.

Wednesday, September 3, 2008
Belay Devices
Climbing is a sport that relies a great deal on your physical and mental stamina. Even though the sport pushes yourself to limits you have never considered possible for yourself, you still need someone you trust climbing with you. This is for safety reasons along with the very obvious reason that you need someone to belay you. Belaying is the process of controlling the amount of rope available to a climber when they are climbing so if a fall were to be taken, it would be the shortest distance possible. Also, why belaying, it is your responsibility to listen to calls from the climber such as “take” which means the climber wants to take a break and lean back in the harness. Becoming belay certified is not a difficult process and usually only takes a couple hours to learn. This process may sound simple enough, but it is crucial that you take a class and learn properly to avoid any disasters. There are multiple ways to belay and they each depend on what type of climbing that will be done. However, there are only a select few belay devices that can be used. Belay devices are used by the person belaying to create friction on the rope to stop any falls or to lower the climber. The most common ones are the ATC, Gri-Gri, and Figure 8.
First is the most common belay device, called an ATC or Air Traffic Controller. This design is lightweight and typically an inexpensive addition. The device offers multiple friction modes depending on which side of the device the rope is guided through. The design of an ATC is ingenious. When lowering a climber using friction, the rope can become very hot. The ATC allows for air flow to cool the heated rope. One downside to the ATC is that it is not an auto-locking belay device. This means if the climber were to fall unexpectedly, the climber would fall until the person belaying has pulled the rope into the breaking position.

Another type of belay device is the Gri-Gri. The Gri-Gri, unlike the ATC, is self-breaking. If there is an unexpected fall, the belay device automatically locks because of the extra weight being applied to the cam so that it pinches the rope. This device is great for indoor climbing or working on new routes. Also, for indoor climbing, the Gri-Gri is best for setting and cleaning the man made routes. A drawback to this belay device is that it is very heavy and expensive.

The last belay device is the Figure 8. This is typically used for repelling. It gets its name because it simply looks like a figure 8. These devices allow a quick but controlled descent on a rope. Also, the design is much like the ATC in that it is made to stay fairly cool when creating friction while coming down the rope. Granted, I would still wear gloves while repelling, it is still a nice feature.

Why Rock Climb?
“’Just one more clip and you’re there!’ Nathan yells. By this point his voice was being drowned out by the rhythmic beating of my heart that was now ringing in my ears. I am not sure how long I have been holding on at this point, but it was long enough to have all my blood circulate into my arms making them shake without warning. Even though it is late fall and the cool breeze was beginning to pick up, I can feel the sweat run down my back. The next clip is in reach, right over my head even. But my body is so weak already and this move requires me to hold myself up on a two finger hold. Two fingers! Using all four limbs was not enough already, let alone supporting my weight on two fingers. Against my better judgment, I looked to see where my last quick draw was clipped in at trying not to notice the 60 feet of open space below me. ‘Great’ I thought, ‘8 feet down to my last clip.’ To let go now would result in almost a 20 foot whipper, the term us climbers use to describe how gravity reminds us were going against him. A whipper of that proportion would not only keep me from climbing tomorrow but also be a relapse in the mental preparation I have overcome the past few months to get here. No. I will not let that happen. I shove my hand into my chalk pouch and prepare myself for my next move. Two fingers, I can do this. Without thinking, I take the hold and go to grab an arm length of rope. Not enough, the clip is higher than I thought. I grab the rope with my teeth to grab another arm length of rope. No time now to think about the horror stories of people falling while biting the rope which I often use to think about when I started lead climbing. My arm starts to shake, much worse now as I get the rope through the last two clips. “Take!” I shout as I finally can relax in my harness and lean away from the cliff. Then I remember I am not alone. I hear the cheering coming from below me of my friends that are celebrating my first 5.10+ clean climb. As tradition, I sit at the top of the wall and look out to take in the view that I have worked so hard to see. In this moment I feel satisfied along with at peace with myself and nature. What other hobby could ever be so fulfilling?”
Subscribe to:
Comments (Atom)
