Top rope climbing put simply, is the rope being attached to the climber, up through an anchor at the top of the route, and then back down to where the person belaying. Where every the climber is on the route, the rope is above them. Here is a picture to illustrate:

The benefits of climbing this way are great. If the climber was to take a fall, it would be only a foot or so fall. Also, the climber has less to worry about and can focus on other things while climbing. Although top rope climbing is the easiest and most fun going, there are skills to be considered. A climber needs to know how to set anchors (if they are not previously set), how to belay and lower a climber, how to tie a figure 8 follow through knot, and follow the figure eight with a safety knot.
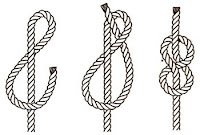
Anchors are at the top of a route where the rope is strung through. These are placed securely by using permanent fixed bolts or pitons, or a natural object such as a tree or boulder. Belaying is an important part of climbing, regardless of why style you chose. For top roping, a belayer is responsible for having the rope properly placed through the belay device and needs to focus on removing slack in the rope while the climber ascends the route. The belayer needs to keep their attention on the climber so if he or she falls, the belayer can quickly hold to keep the climber from falling to far. The figure-8-follow-through knot may be the most complicated part of climbing. First, the climber ties a figure 8 knot, which you can see how to do in the following photo.

After tying this knot, you pull the rope through 2 points on contact in your harness (your waist loop and the harness loop between your legs.) Then you retrace the figure-8 with the loose end of the rope. Be sure to make sure you are going over and under in the appropriate places. After this, you should have the loose end of the knot sticking out in the same direction the rope on the route is facing. Here, you will tie a safety knot, which is much like a fisherman’s knot. Once you are finished, it should look like this.


No comments:
Post a Comment